In this guide, I will show you how to add an SSH key to GitLab. I am running on Linux Pop!_OS (Ubuntu), but the steps should also work on Windows & MacOS. As for why you want to use SSH? Security aside, it is convenient AF if set up correctly (and I will show you how to set it up correctly). You will be able to connect to GitLab by doing nothing more than:
ssh gitlabFinally, clone repositories commands like this:
git clone git@gitlab.com:example.username/example.repo.gitNo password remembering is required here—yes, it gives you the magical ability to download a repo without needing to type in a password, all with a minuscule > 2-minute setup time. No more remembering login credentials for servers, no more complicated IP remembering (thanks to the SSH config file – my beloved), and last but not least, no more SSH KEY HELL not knowing where to store them. Best of all, this comes by default with Ubuntu and most other common operating systems.
What are public and private keys?
No password?
But how do we log in then?
That’s the neat thing about using public-private key pairs. There are public and private key files – generated in pairs like a key and lock – you give the server the public key, and you have the private key.
Keep the private key safe, don’t share it – treat it like a password.
The public key is for sharing – you upload it to the server. When you connect, your private key proves it’s really you by solving a challenge set by the server, like a digital secret handshake.

This is what we use when we connect via SSH to “log in” / authenticate.
READ THIS BEFORE GENERATING YOUR FIRST SSH KEY PAIR
Two important principles
SSH keys are free, the effort it takes to create one is minuscule at best, and they don’t consume any additional runtime resources. Create one for each server, client, or service you connect to so you have a different public/private key pair. The reason why we do this is that if we accidentally leak or push the private key file – which you should never do – the private key stays on your machine – you only need to change the key for one service instead of every single one (just imagine opening every tool you set up in the past months to change it manually).
Always put a password on your SSH key – I will show you how to get around typing it in manually later using an SSH agent. Why do we do this? A similar reason as above – if you leak the private key file by accident – which should never happen – you have some time left until the password is broken so that you can revoke access for the old key and generate a new one before an attacker can use your key.
Generate SSH Key Pair
SSH provides us with the ssh-keygen command, which we can use! There are different algorithms to generate the key; I suggest using ed25519. Old systems might need to use an RSA key. To generate our GitLab SSH key, enter:
ssh-keygen -t ed25519 -f ~/.ssh/gitlab.ed25519-t encryption method
-f file location inside home .ssh directory
Hint: the name does not need to include the encryption method (ed25519) – it is purely for context
optionally
-C a comment -> useful to set additional info for context
ssh-keygen -t ed25519 -f ~/.ssh/gitlab.ed25519 -C "usefull context, email, device name etc"Now you should be prompted for a passphrase
– feel free to generate & copy one from the password manager of your choice
– or type by hand
you should be able to get the contents of your public key using
cat ~/.ssh/gitlab.ed25519.pubcopy the entire output we will need it in GitLab later
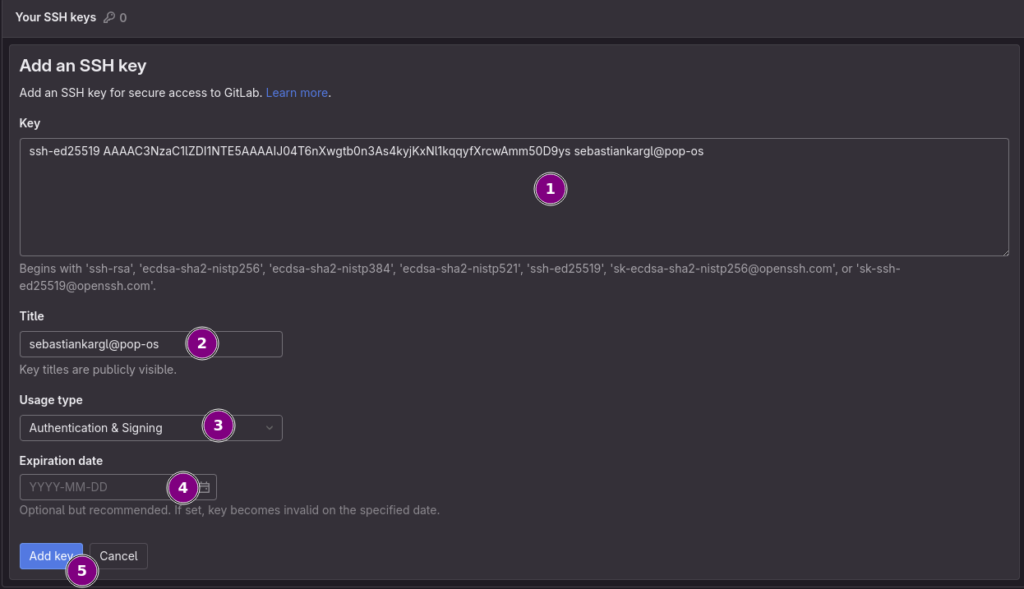
ssh-ed25519 AAAAC3NzaC1lZDI1NTE5AAAAIJ04T6nXwgtb0n3As4kyjKxNl1kqqyfXrcwAmm50D9ys sebastiankargl@pop-osSet Public Key in GitLab
got to edit profile in GitLab

Once there click the ssh key in the sidebar

Then click Add new ssh key

paste in your PUBLIC KEY
check the information and set or omit your expiration date
then hit add key

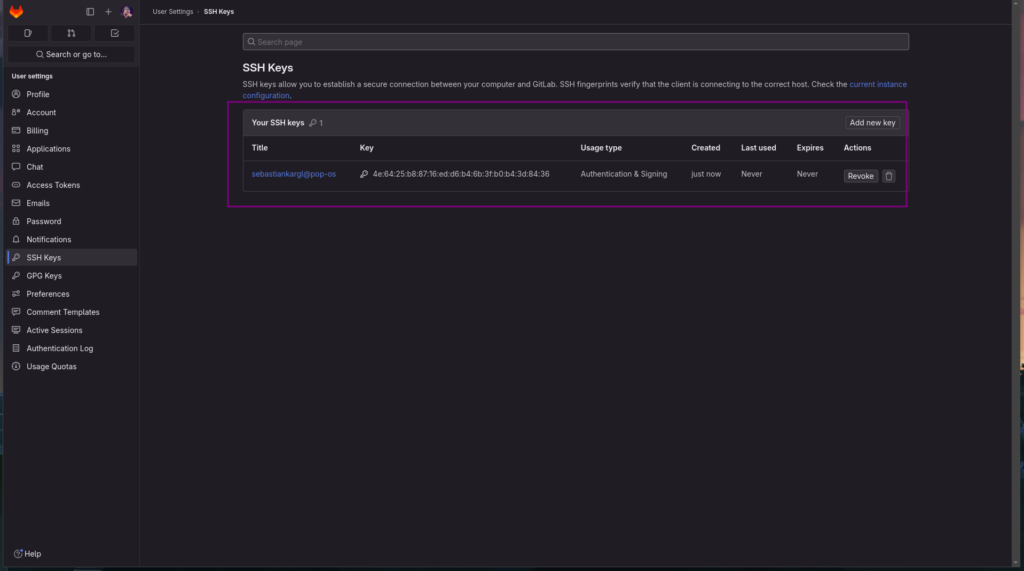
it should now be visible in the SSH keys section

Test if it works?
we can just use the SSH command to connect to gitlab.com
we need to tell ssh to use our gitlab.ed25519 private key file and not some other private key we might already have
we do this by using -i and specifying the path to the key file like this
ssh -i ~/.ssh/gitlab.ed25519 git@gitlab.comaccept the fingerprint by typing yes

after being prompted for our private key password we should get this response

Done!
How to Level this Up using SSH Config & SSH-Agent
Up until now, there was no real benefit to user experience using public/private keys
We still need to remember a complicated password, a domain at best and ip at worst which is annoying
with a neat little thing called an SSH config file, we can start unlocking SSH superpowers
we can turn this
ssh -i ~/.ssh/gitlab.ed25519 git@gitlab.cominto this
ssh gitlabwith an ssh-agent (that is already on popos) we can eliminate the need to be asked for the password to our private key files because the agent manages the passwords
– let’s get cooking >:3
create a config file in your user’s SSH folder
nano ~/.ssh/configpaste the following entry into it
Host gitlab
    HostName gitlab.com
    User git
    PreferredAuthentications publickey
    IdentityFile ~/.ssh/gitlab.ed25519
And you are golden!
Now if you type in
ssh gitlab you should connect! WOHOO!!! 🎉🎉🎉

We did pretty well here – for the piece de resistance – let’s get the password management automated by an SSH agent. (please talk to your team / IT Sec before doing this in a company – they might have their preferred method or guidelines regarding this!)
popos has this built in!
you might have realized after entering the password once – you did not have to retype it in the terminal
even when opening a new terminal! “Wohoo”
When you enter your password for the first time
you can check the “Automatically unlock this key whenever I’m logged in” box to unlock to have it unlocked when you start your computer

(again talk with Team / IT security about this)
if you want to remove all saved passwords (so you can check the box mentioned above) to get better convenience
ssh-add -Dif you don’t have a GUI you can use
ssh-addto add keys to your ssh-agent
That’s it you now know more than most people do about .ssh from a simple starting-out tutorial 😀
Enjoy! – 😀 – feel free to let me know if the guide helped you down below
Pingback: Log of a DevOps Noob Day 5 – Sebastian Kargl